
 Home
Home Gezfeel
 Jul 29 2025
Assembling a dive watch yourself is a rewarding project that blends craftsmanship and technical skill. While dive watches are engineered for extreme conditions (water resistance, durability), building one at home is possible with the right materials, tools, and patience. This guide breaks down everything you need to know—from key components to pro tips—so you can create a functional, reliable dive watch.
Is It Possible to Assemble a Dive Watch at Home?
First, a reality check: Professional dive watches undergo rigorous testing (pressure testing, durability checks) to meet industry standards (e.g., ISO 6425 for dive watches). A home-assembled watch may not match those standards, but it can still be water-resistant enough for casual swimming or snorkeling—if done correctly.
This project is best for hobbyists with basic watch repair experience. If you’re new to watchmaking, start with simpler models before tackling a dive watch, as waterproofing and precision are critical.
Materials You’ll Need
Dive watches rely on specialized components to handle water pressure and harsh conditions. Here’s what you’ll need to source:
1. Core Components (Dive-Specific)
- Case: Choose a stainless steel or titanium case rated for at least 100m water resistance (preferably 200m+). Look for features like a screw-down crown (seals better than a push-pull crown) and a unidirectional bezel (prevents accidental rotation, critical for tracking dive time).
- Case Back: A solid, screw-down case back (not a snap-on) with a rubber gasket for extra water resistance.
- Crystal: Sapphire or mineral glass with an anti-reflective coating. Sapphire is more scratch-resistant—ideal for dive watches that face sand, rocks, or saltwater.
- Movement: A reliable quartz or mechanical movement. Quartz is easier for beginners (less complex, more accurate). Look for movements with a date function if you want that feature.
- Dial & Hands: Dials with luminescent markers (Super-LumiNova is a good choice) for low-light visibility underwater. Hands should also be luminescent and easy to read.
- Bezel: A unidirectional rotating bezel (aluminum or ceramic) with clear markings. Ceramic is more durable but pricier.
- Gaskets & O-Rings: High-quality rubber or silicone gaskets for the case back, crown, and bezel. These are critical for water resistance—never reuse old gaskets.
- Strap/Bracelet: A water-resistant strap (rubber, stainless steel, or nylon) with a secure clasp. Rubber is ideal for saltwater, as it resists corrosion.
2. Tools for Assembly
You’ll need precision tools to avoid damaging components. Invest in these:
- Watch Case Opener: To remove and secure the screw-down case back.
- Spring Bar Tool: To attach the strap or bracelet to the case.
- Tweezers (Non-Magnetic): For handling small parts like hands and gaskets (magnetic tools can damage the movement).
- Screwdrivers (Watch-Specific): Small, precision screwdrivers (size 000 or smaller) for screws on the case back or bezel.
- Lubricant (Watch-Safe): To coat gaskets and O-rings—this improves water resistance and prevents drying.
- Pressure Test Pump (Optional but Recommended): To check water resistance after assembly (you can also take it to a professional for testing).
- Magnifying Glass or Loupe: To inspect small parts and ensure proper alignment.
Step-by-Step Guide to Assembling Your Dive Watch
Step 1: Prepare Your Workspace
Set up a clean, flat surface with good lighting. Lay out all components and tools—organization prevents lost parts. Avoid static (wear a grounding wristband if possible) to protect the movement.
Step 2: Install the Movement into the Case
- Place the movement into the case, ensuring it fits snugly. Some cases have a holder or screws to secure it—tighten these gently (over-tightening can damage the movement).
- If your movement has a stem (the part that connects to the crown), insert it into the crown mechanism and test: twist the crown to ensure it adjusts time smoothly.
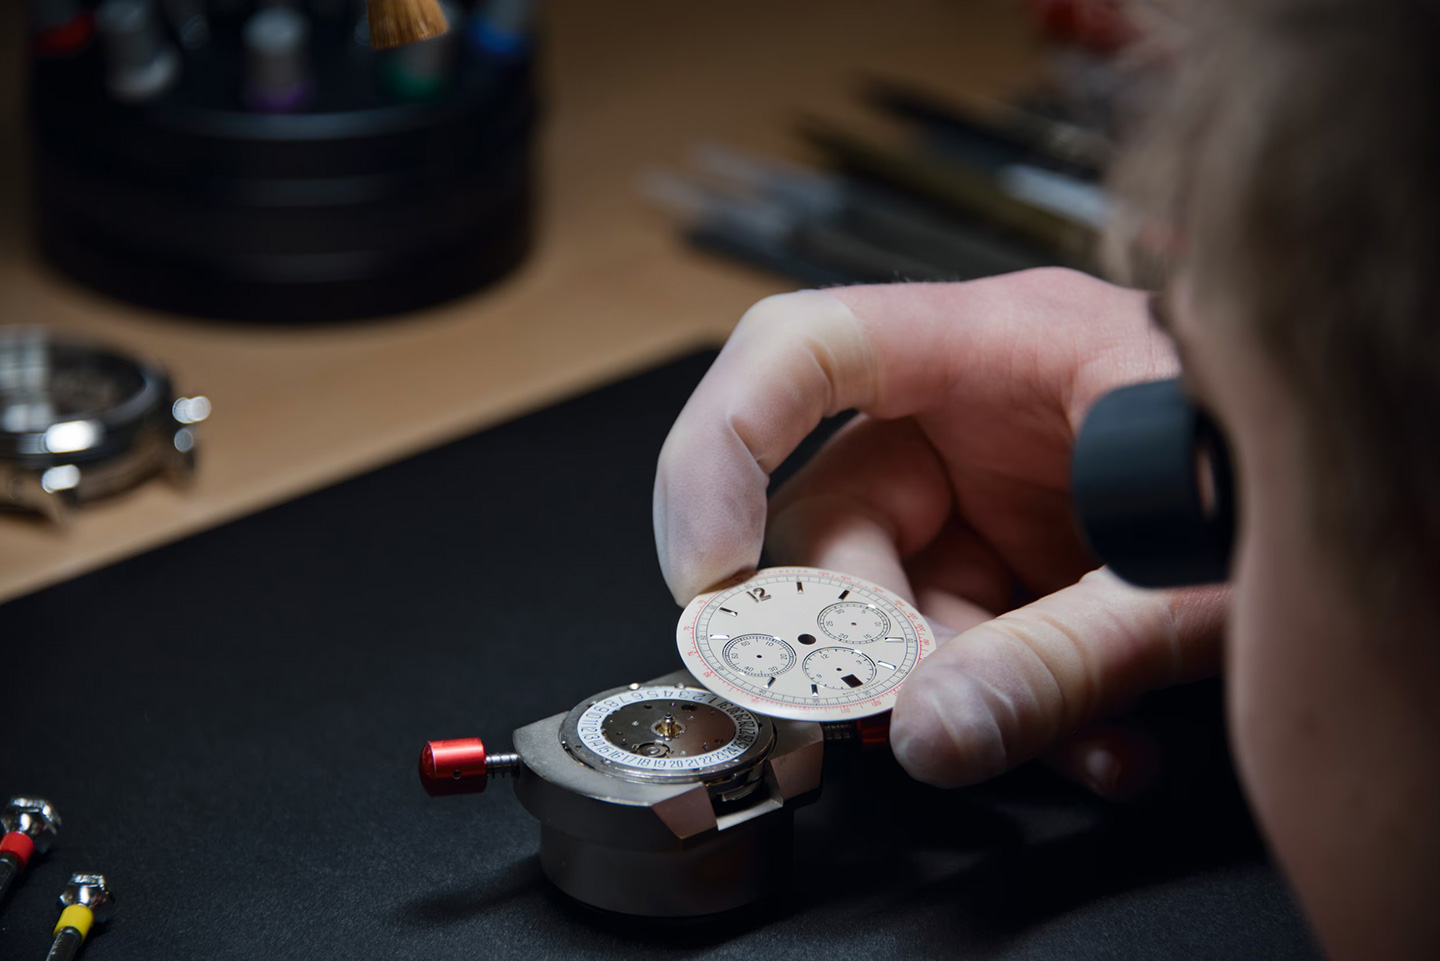
Step 3: Attach the Dial and Hands
- Use tweezers to place the dial onto the movement. Align it so markers line up with the case (e.g., 12 o’clock should match the case’s 12 o’clock position).
- Press the hands onto the movement’s arbor (the small post in the center of the dial). Start with the hour hand, then minute, then second (if included). Ensure they don’t touch the dial or each other—this causes jamming.
Step 4: Install the Bezel
- Clean the bezel groove in the case to remove dust. Apply a thin layer of lubricant to the bezel’s O-ring.
- Press the bezel into the groove, ensuring it rotates smoothly in one direction (unidirectional). Test it: rotate it to 12 o’clock and check that it clicks into place.
Step 5: Add the Crystal
- Place the crystal over the dial. If it’s a press-fit crystal, gently press it into the case until it’s flush. For screw-down crystals, twist it clockwise until tight (use a crystal press tool if needed to avoid cracks).
Step 6: Seal the Case Back
- Clean the case back gasket with a soft cloth, then coat it with watch-safe lubricant.
- Align the case back with the case (some have notches to match) and screw it on clockwise. Tighten it firmly but not excessively—over-tightening can warp the gasket.
Step 7: Attach the Strap or Bracelet
- Use the spring bar tool to insert spring bars into the strap/bracelet.
- Line up the strap with the case lugs and push the spring bars into place until you hear a “click.” Test the strap to ensure it’s secure.
Step 8: Test for Functionality and Water Resistance
- Wind the watch (if mechanical) or insert the battery (if quartz) and check that it keeps time.
- Test the crown: twist it to set time and date (if applicable) to ensure smooth movement.
- Check water resistance: If you have a pressure pump, test it at 100m (or your case’s rated depth) for 10–15 minutes. If not, avoid submerging it immediately—wear it for a day to check for condensation (a sign of leaks).
Pro Tips for Success
- Prioritize Gaskets: Old or dry gaskets are the biggest cause of leaks. Always use new, lubricated gaskets.
- Take It Slow: Rushing leads to mistakes (e.g., misaligned hands or over-tightened screws).
- Know Your Limits: Home assembly is great for hobbyists, but for a watch you’ll use for deep diving, consult a professional. They have tools to test pressure accurately.
- Learn from Mistakes: If a part doesn’t fit, check for alignment—don’t force it. Research tutorials for your specific components.
Final Thoughts
Assembling a dive watch yourself is a fun way to connect with watchmaking craftsmanship. While it may not replace a professionally built dive watch for deep-sea use, it’s a rewarding project that lets you create a unique timepiece. With the right materials, tools, and care, you can build a watch that’s both functional and personal.
Ready to start? Source quality components, follow the steps, and enjoy the process—your custom dive watch is worth the effort.
#divingwatch #customwatchmanufacturer #watchmanufacturer #oemwatch #customwatch


 Address: Room 405, Building A, Qianhai Zhichuang Technology Industrial Park, No.60 Nanchang Road, Nanchang Community, Xixiang Street, Baoan District, Shenzhen, China